Video files are often very large. A typical 1920x1080 video, 30fps, 24 bits color depth will need about 1.5 gigabits for only a second. This is a challenge when we need to store or deliver those files, especially in live-streaming services, where we have to transmit the data in real-time. This is when video compression comes into play. Compression is essential for reducing the size of videos so that they can be stored, transmitted, and played back effectively. So when you upload a video anywhere, the platform you upload to has to compress the video to save space on its servers.
Compression can be lossless (in which no data is discarded from the image) or lossy (in which data is selectively discarded). The more compression applied, the more data is lost and the worse the approximation looks on the video versus the original.
Lossless and lossy video compression
Lossy compression discards some data during the compression process. Data is permanently removed, which is why this method is also known as irreversible compression. Upon decompression, an approximation of the original is created, and the overall quality is decreased.
Lossless compression works by eliminating redundancy in the video. It reduces file size by identifying redundant patterns in video data and replacing duplicates with references to earlier instances. Unlike lossy compression, this process ensures no data is permanently lost - it simply stores the information more efficiently.
With lossless compression, you can perfectly reconstruct the original file, but the compressed file will take up more space compared to the lossy one. If a “good enough” copy is sufficient, lossy compression will save you a significant amount of space. Most of the compression techniques discussed below are lossy algorithms.
Compression techniques: spatial compression and temporal compression
There are two general methods to compress a video. The first way, known as spatial compression, is applied to a single frame of data, independent of any surrounding frames. This method is pretty much the same as image compression.
Another approach is to reduce “redundant” information from frame to frame. This technique, known as temporal compression, identifies the differences between frames and stores only those differences.
Let’s get into details about each approach.
Spatial compression
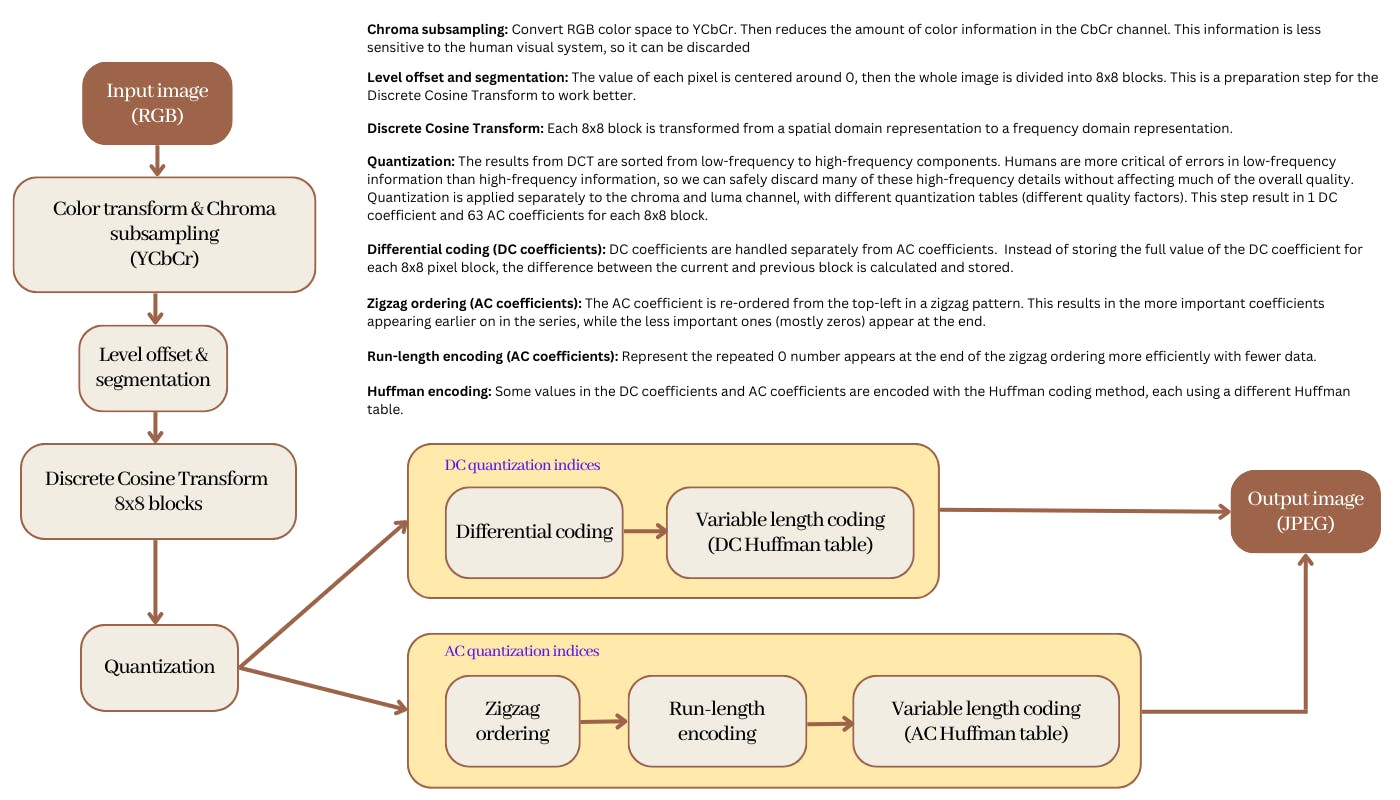
Spatial (or intraframe) compression takes place on each frame of the video, compressing the pixel information as if it were a still image. Therefore, the video can use the same technique as the JPEG file to compress each frame separately.
I have written an article describing the process of JPEG compression, you can read it here. Below is a summary of the main steps.
Temporal compression
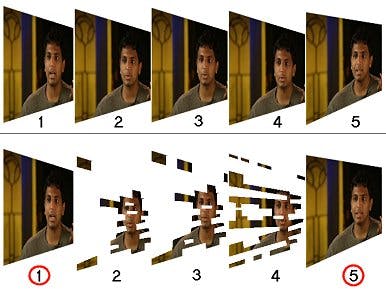
Video is a sequence of still images that, when played together, simulate motion. However, there are lots of elements from frame to frame that will remain nearly identical. For example, if someone is talking while standing in front of a motionless background, it’s unlikely that the background will change. As a result, that’s a lot of wasted bandwidth used just to convey that something hasn’t changed. This realization leads to the idea of interframe prediction (or temporal compression), removing redundant data that has not changed across frames.
Here is an example from blog.video.ibm, that helps us visualize this concept.

So we have a still image of a volleyball being thrown and spiked. There is quite a bit of movement in this photo, with the volleyball being thrown up, the ball being spiked, sand flying, and elements moving from the wind like trees and water. Regardless, some parts in the picture can be reused, specifically areas of the sky. So rather than spend valuable data to convey that parts of the sky haven’t changed, they are simply reused to conserve space. As a result, only the below elements of the video are changing between frames in this series.

Temporal compression works best with video with a little motion. For videos with a lot of action and movement, it will take up more data or look worse when heavy compression is applied.
To manage the interframe technique, a video codec (more on this later) use a three-frame approach that includes: keyframes, p-frames, and b-frames.
Keyframes (I-frames)
Keyframe is the full frame of the image in a video, that has complete information. While subsequent frames, the delta frames, only contain the information that has changed. Keyframe can also be referred to as a reference or standalone frame and can be used to construct a full version of a delta frame.

Keyframes will appear multiple times within a stream. The more often keyframes are created, the more space this requires. Adaptive streaming, which can only change quality settings on keyframes, often does periodic keyframes every 2 seconds.
P-frames
The p-frames, also known as predictive frames or predicted pictures, follow another frame and only contain part of the image that has changed. To describe a motion, the p-frames can look at previous frames and tell the pixels to move in the correct direction.
B-frames
B-frames can look backward and forward to a previous or later frame for redundancies, hence the name “bi-directional predicted frames”. The b-frames are quite similar to the p-frames, with the addition of being able to also look to the future for references. This flexibility means that b-frames have the highest level of compression and are more efficient. However, they do require a higher encoding profile.
Compression artifact (or artefact)
Lossy data compression involves discarding some of the video data so that it becomes small enough to be used efficiently. But sometimes, the compression algorithm may not be good enough to discriminate between distortions of little subjective importance and those notably recognizable by the viewer.
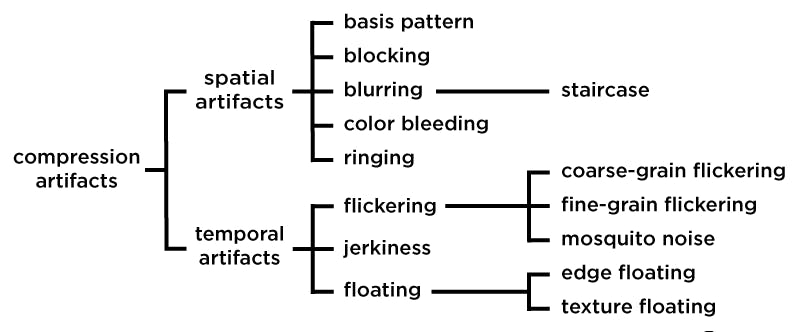
Here are some examples of compression artifacts.
- Jerkiness effect due to missing i-frames

- Blurring often occurs in regions that have texture, like trees, fields of grass, waves…

- Blocking artifacts: objects or areas of a video image appear to be made up of small squares, rather than proper detail and smooth edges
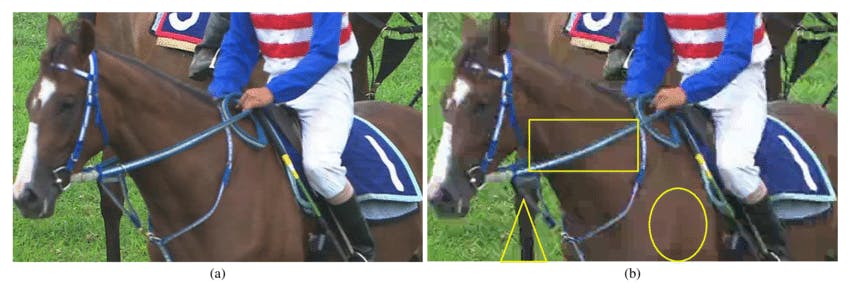
- Mosquito noise artifacts: appear in sequence as a shimmering blur of dots around the edges

Video codecs, container, and format
The word codec is the combination of two words: coder and decoder. A video codec is a hardware or software that compresses and decompresses digital video, to make file sizes smaller and make the distribution of the videos easier.
It’s important to distinguish codecs from container formats, though sometimes they share the same name. Container formats, or wrappers, are file formats that can contain specific types of data, including audio, video, closed captioning text, and associated metadata.
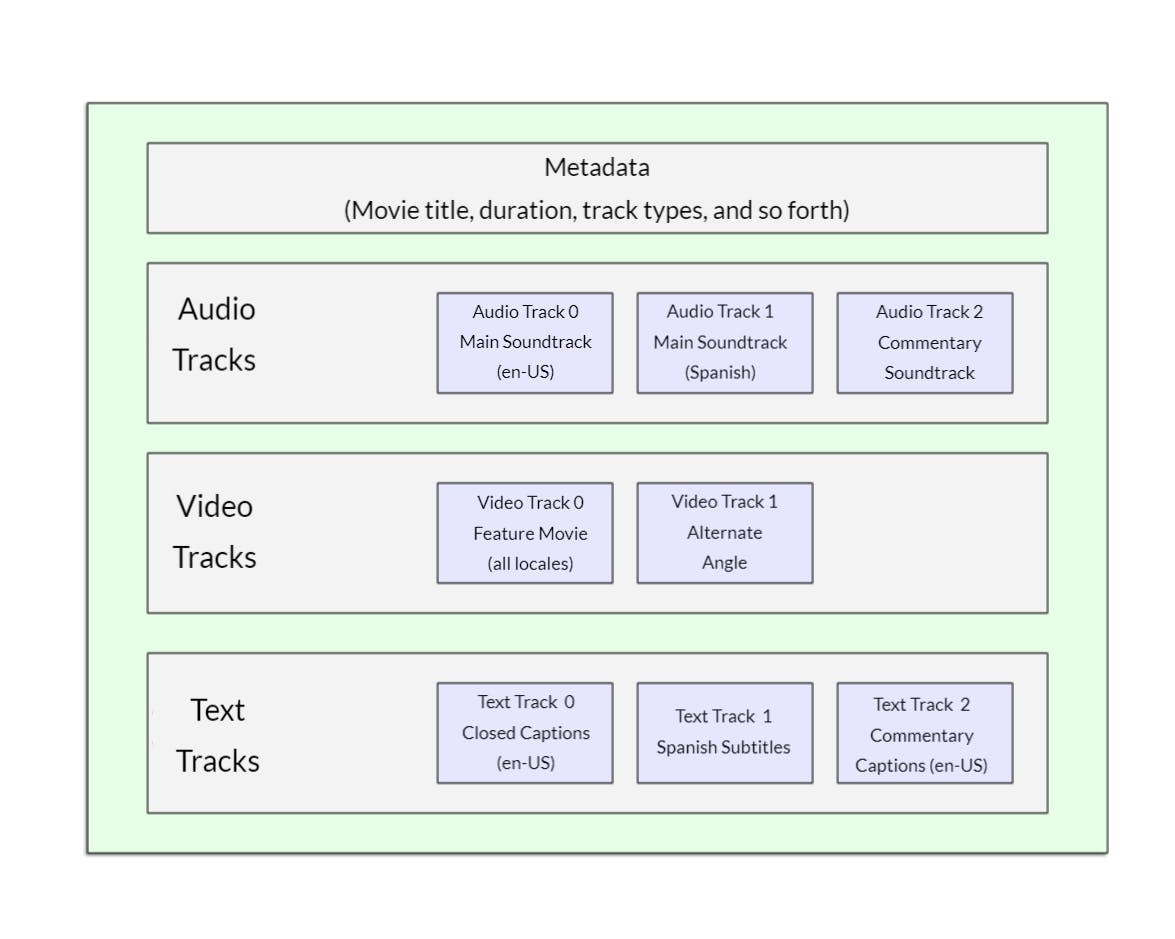
Below are some different types of video file codes, with their advantages and disadvantages.
H.264/AVC (Advanced Video Coding)
Pros:
Most widely supported video codec, compatible with virtually any device.
Excellent for streaming, has a large market share.
Cons:
- Not suitable for 4K or higher resolution or HDR (high dynamic range) content.
Container Formats: MP4, MOV, F4V, 3GP, TS.
H.265/HEVC (High-Efficiency Video Coding)
Pros:
Successor to H.264, designed to create smaller files and decrease bandwidth.
File encoded with HEVC can be 50% smaller than AVC.
Good for high resolution such as 4K or 8K.
Cons:
Much more complicated to encode.
Cost issues involving patents and royalties -> lower adoption rate.
Container Formats: TS, MP4, 3GP, MKV.
VP9
Pros:
Developed by Google as an open and royalty-free codec.
Good for high-resolution streaming.
Compatible with multiple platforms: YouTube, Chrome, Android phone, Mozilla’s Firefox, Apple’s Safari, and all new iOS devices (from iOS 14).
Cons:
Take more time to encode video compared to AVC.
Still not widely supported as AVC.
Container Formats: WEBM, MKV
Now let’s talk about video format. A video format is a standardized set of rules for storing containers, codecs, metadata, and folder structure. These are the most common digital video formats and their most frequent uses.
MP4/MPEG-4
MP4 is the most common and most popular video format. MP4 files are relatively small, but the video quality is high. Compression of these files only causes a very slight loss of quality.
The downside is that the header file is large, and data is cached during download. As a result, the video starts slowly. If you drag the time axis to any time point, it takes some time to cache.
HLS/ HTTP Live Streaming
HLS is designed for reliability and dynamically adapts to network conditions by optimizing playback for the available speed of connections (also known as adaptive bitrate streaming). Videos are segmented and played by segment and start quickly with less freezing.
If you drag the time axis to any time point, the corresponding segment can be quickly located and played.
MPEG-DASH/Dynamic Adaptive Streaming Over HTTP
Similar to HLS, the key difference is that HLS streaming uses a client-side algorithm to switch between different bitrates, while DASH uses a server-side algorithm to make adaptation decisions, which allows for more fine-grained control over the quality of the video stream.
HLS Player has a higher latency compared to DASH, as the former requires a buffer time to switch between different bitrates, while DASH can adapt more quickly to changes in network conditions.
Video compression is all about finding the right balance between quality and file size. Researchers still develop new methods and algorithms to make better compression. One approach is training machine learning models that have the potential to perform better than today's block-based hybrid encoding standards. Video processing is still improving day by day to meet the growing demand for high-quality video on low bandwidth and limited storage.
That’s all for today's blog post, hope you liked it.
References
The difference between lossless and lossy video compression.
About video and audio encoding and compression
What is Video Encoding? Codecs and Compression Techniques
WHAT DOES 4: 2: 0 MEAN? CHROMA SUBSAMPLING EXPLAINED
Characterizing Perceptual Artifacts in Compressed Video Streams - Kai Zeng
