


When an application starts, the Android system starts a new process for that application with a single thread of execution (the main thread). In Android, the application itself does not directly control its process lifetime. Instead, the system determines an application lifetime base on how important the app is to the user and how much overall memory is available. Under a critical situation where the free memory got so low, the system needs to reclaim memory by killing the least essential processes to keep the system performing. This article will talk about how the Android system decides which app can be killed to free memory without negatively affecting the user, and the strategy to preserve UI states when your app is killed by the system.
Memory pressure and process’s priority
Memory pressure is a state in which the system is running short on memory. The system needs to free memory by killing unimportant processes or requesting processes to free noncritical cached resources. When deciding which processes to kill, the Android system weighs their relative importance to the user based on the components running in them and the state of those components.
Below is the importance-hierarchy of the process (not including native or system processes that come with Linux):
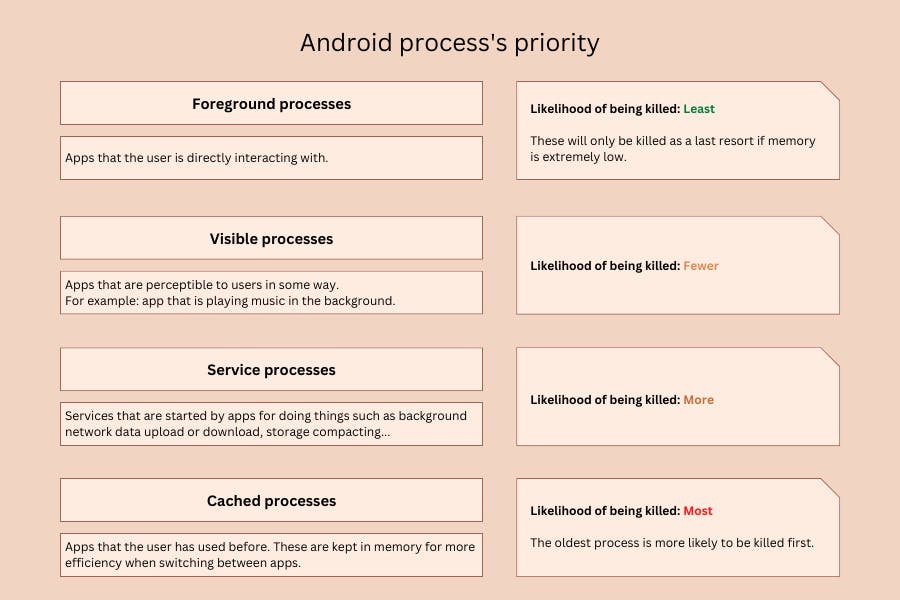
Foreground process: the process that the user is currently interacting with. A process is considered to be in the foreground if it satisfies one of the following conditions:
- Has a running activity at the top of the screen (onResume() callback of the activity has been called).
- Has a running broadcast receiver (onReceive() method is executing).
- Contains a service that is currently executing code in one of its callbacks (onCreate(), onStart(), or onDestroy()).
These processes have the highest priority and are the last ones to be killed under memory pressure.
Visible process: the process that is perceptible to users in some way, such as an app that is playing music in the background. A process is considered visible in the following conditions:
- Has a running activity that is visible to the user on-screen but not in the foreground (onPause() callback of the activity has been called). An example is when the foreground activity displays a dialog to the user.
- Has a foreground service running.
- Contains a service that the system is using for a particular feature that the user is aware of, such as a live wallpaper or input method service. These processes are also considered important and will not be killed unless doing so is required to keep all foreground processes running.
Service process: the process that contains a service for doing things such as background network data upload or download, storage compacting… Services that have been running for a long time may be demoted in importance to avoid excessive resource use. Although these processes are not directly visible to the user, they are generally still doing essential things, so the system will try to keep them alive there is not enough memory to retain all foreground and visible processes.
Cached process: the process that the user has used before but is not currently needed. These are kept in memory for more efficiency when switching between apps. The system is free to kill these processes as desired when resources like memory are needed elsewhere. The older process is, the more likely it is killed first.
When deciding how to classify a process, the system will base its decision on the most important level found among all the components currently active in the process. If you don’t want your long-running operation to be killed when the user moves away from your app, ensure that your process has a high priority. You can visit the official guide Processes and app lifecycle to learn more about processes and app lifecycle.
Preserve UI states when the application is killed under memory pressure
The users expect the UI to remain the same if they temporarily switch away from your app and come back later. However, the system may destroy your application’s process while the user is away. To ensure a smooth user experience, your app should preserve the UI state as it has never been killed before.
When the activity is destroyed due to memory constraints, the system remembers that it existed and saves a set of data of that activity right before it was killed. These saved data are called the instance state and will be available as the activity is recreated later.
onSaveInstanceState()
When your activity begins to stop, the system calls the onSaveInstanceState() method for your activity to save necessary information. Data will be stored in the Bundle object, which is a set of key-value pairs. The default implementation of this method has already saved the state of the activity's view hierarchy, such as the text in EditText or the RecyclerView’s current scroll position. Because of that, you should always call super class implementation when override onSaveInstanceState().
// Code from: https://developer.android.com/guide/components/activities/activity-lifecycle#save-simple,-lightweight-ui-state-using-onsaveinstancestate
override fun onSaveInstanceState(outState: Bundle?) {
    // Save the user's current game state
    outState?.run {
        putInt(STATE_SCORE, currentScore)
        putInt(STATE_LEVEL, currentLevel)
    }

    // Always call the superclass so it can save the view hierarchy state
    super.onSaveInstanceState(outState)
}

companion object {
    val STATE_SCORE = "playerScore"
    val STATE_LEVEL = "playerLevel"
}
onSavedInstanceState() requires serialization on the main thread and consumes system-process memory, so it is not appropriate to store a large amount of data. If you need to preserve more complex data structures or something more persistent, considers saving data in the local database or SharedPreferences when your activity is in the foreground.
onRestoreInstanceState()
When your activity is recreated after it was previously destroyed, you can use both the onCreate() and onRestoreInstanceState() callback methods to receive the saved instance state.
With the onCreate() method, you must check whether the state Bundle is null before you attempt to read it. If it is null, then the system is creating a fresh instance of the activity, instead of restoring a previous one that was destroyed.
// Code from: https://developer.android.com/guide/components/activities/activity-lifecycle#save-simple,-lightweight-ui-state-using-onsaveinstancestate
override fun onCreate(savedInstanceState: Bundle?) {
    super.onCreate(savedInstanceState) // Always call the superclass first

    // Check whether we're recreating a previously destroyed instance
    if (savedInstanceState != null) {
        with(savedInstanceState) {
            // Restore value of members from saved state
            currentScore = getInt(STATE_SCORE)
            currentLevel = getInt(STATE_LEVEL)
        }
    } else {
        // Probably initialize members with default values for a new instance
    }
    // ...
}
Another way of restoring data is using onRestoreInstanceState(), which the system calls after the onStart() method. The system calls this method only if there is a saved state to restore, so no null check is required.
// Code from: https://developer.android.com/guide/components/activities/activity-lifecycle#save-simple,-lightweight-ui-state-using-onsaveinstancestate
override fun onRestoreInstanceState(savedInstanceState: Bundle?) {
    // Always call the superclass so it can restore the view hierarchy
    super.onRestoreInstanceState(savedInstanceState)

    // Restore state members from saved instance
    savedInstanceState?.run {
        currentScore = getInt(STATE_SCORE)
        currentLevel = getInt(STATE_LEVEL)
    }
}
In cases where your activity contains a ViewModel, you can provide access to a saved state in ViewModel objects with the SavedStateHandle module through its constructor. SavedStateHandle object is a key-value map that lets you write and retrieve data. These values persist after the process is killed by the system and remain available through the same object.
Don’t keep activities
“Don’t Keep Activities” is a setting under the “Developer options”, which destroys every Activity as soon as the user leaves it. This setting is intended to simulate the case that Android kills an activity in the background due to memory pressure. So this is a pretty handy tool for debugging your app.
Let’s take an example.
Here we have 2 activities, the first one requires users to enter their names, and the second one does a simple counter. The user’s name will be stored in an object class because we need it from other parts of the app.
// WelcomeActivity.kt
// static object to store user data
object UserInfo {
    var name: String = "Unknown"
}

class WelcomeActivity : AppCompatActivity() {

    private lateinit var binding: ActivityWelcomeBinding

    override fun onCreate(savedInstanceState: Bundle?) {
        super.onCreate(savedInstanceState)
        binding = ActivityWelcomeBinding.inflate(layoutInflater)
        val view = binding.root
        setContentView(view)

        binding.confirmButton.setOnClickListener {
            UserInfo.name = binding.usernameInput.text.toString()
            val intent = Intent(this, MainActivity::class.java)
            startActivity(intent)
        }
    }
}
// MainActivity.kt
class MainActivity : AppCompatActivity() {

    private lateinit var binding: ActivityMainBinding

    private var count = 0

    override fun onCreate(savedInstanceState: Bundle?) {
        super.onCreate(savedInstanceState)
        binding = ActivityMainBinding.inflate(layoutInflater)
        val view = binding.root
        setContentView(view)
        setWelcomeText()
        setCounterText()
    }

    override fun onSaveInstanceState(outState: Bundle) {
        super.onSaveInstanceState(outState)
        outState.putInt(STATE_COUNTER, count)
    }

    private fun setWelcomeText() {
        binding.welcomeText.text = "Hello ${UserInfo.name}"
    }

    private fun setCounterText() {
        binding.counter.text = count.toString()
    }
}
As you can see, we do not have any mechanism for preserving the UI state at the moment. If you press the home button while the “Don’t Keep Activities” setting is enabled, the activity will be destroyed. When you open the app again, the counter will be reset to 0.
So we know what the setting does, let’s implement the onSaveInstanceState() methods to preserve the state and keep our app meeting users' expectations.
class MainActivity : AppCompatActivity() {

    private lateinit var binding: ActivityMainBinding

    private var count = 0

    companion object {
        private const val STATE_COUNTER = "state_counter"
    }

    override fun onCreate(savedInstanceState: Bundle?) {
        super.onCreate(savedInstanceState)
        binding = ActivityMainBinding.inflate(layoutInflater)
        val view = binding.root
        setContentView(view)

        if(savedInstanceState != null) {
            count = savedInstanceState.getInt(STATE_COUNTER)
        }

        setWelcomeText()
        setCounterText()
    }

   override fun onSaveInstanceState(outState: Bundle) {
        super.onSaveInstanceState(outState)
        outState.putInt(STATE_COUNTER, count)
    }
}
Now after coming back to the app, the counter has been restored successfully, and everything is working great, right? Well, there is a catch. Under memory pressure, the system never kills an activity directly to free up memory. Instead, it kills the process in which the activity runs, destroying not only the activity but everything else running in the process, as well. You might already see the problems with our example. We store the user’s name in a static object, and it is alive as long as the process is alive. Keep in mind that the “Don’t Keep Activities” only destroys the activity individually, not the process itself. In real life scenario though, the whole process will be killed, so all the static objects are gone too.
To simulate this scenario realistically, you can use a 3rd-party app to fill up RAM like the video below. Then you probably see this bug: a counter is restored successfully, but the user’s name is gone.
Now, all we need to do is store the user’s name and we are good to go.
class MainActivity : AppCompatActivity() {

    private lateinit var binding: ActivityMainBinding

    private var count = 0

    companion object {
        private const val STATE_COUNTER = "state_counter"
        private const val STATE_USER_NAME = "state_user_name"
    }

    override fun onCreate(savedInstanceState: Bundle?) {
        super.onCreate(savedInstanceState)
        binding = ActivityMainBinding.inflate(layoutInflater)
        val view = binding.root
        setContentView(view)

        if(savedInstanceState != null) {
            count = savedInstanceState.getInt(STATE_COUNTER)
            UserInfo.name = savedInstanceState.getString(STATE_USER_NAME, "")
        }

        setWelcomeText()
        setCounterText()
    }

    override fun onSaveInstanceState(outState: Bundle) {
        super.onSaveInstanceState(outState)
        outState.putInt(STATE_COUNTER, count)
        outState.putString(STATE_USER_NAME, UserInfo.name)
    }
}
Conclusion
Preserving and restoring an activity's UI state is a crucial part of the user experience. There are lots of things that need to be considered to make sure your app can run as smoothly as possible. Remember to test your app under special constraints, some random bugs may occur that you might not anticipate.
Hope this post is helpful to you. Happy coding.